
Being able to generate reports that show a snapshot of data has always been a challenge that is usually solved with a dedicated 3rd-party BI tool. A snapshot report usually shows, at specific points in time, the count of some kind of value or status that doesn’t change.
The challenge
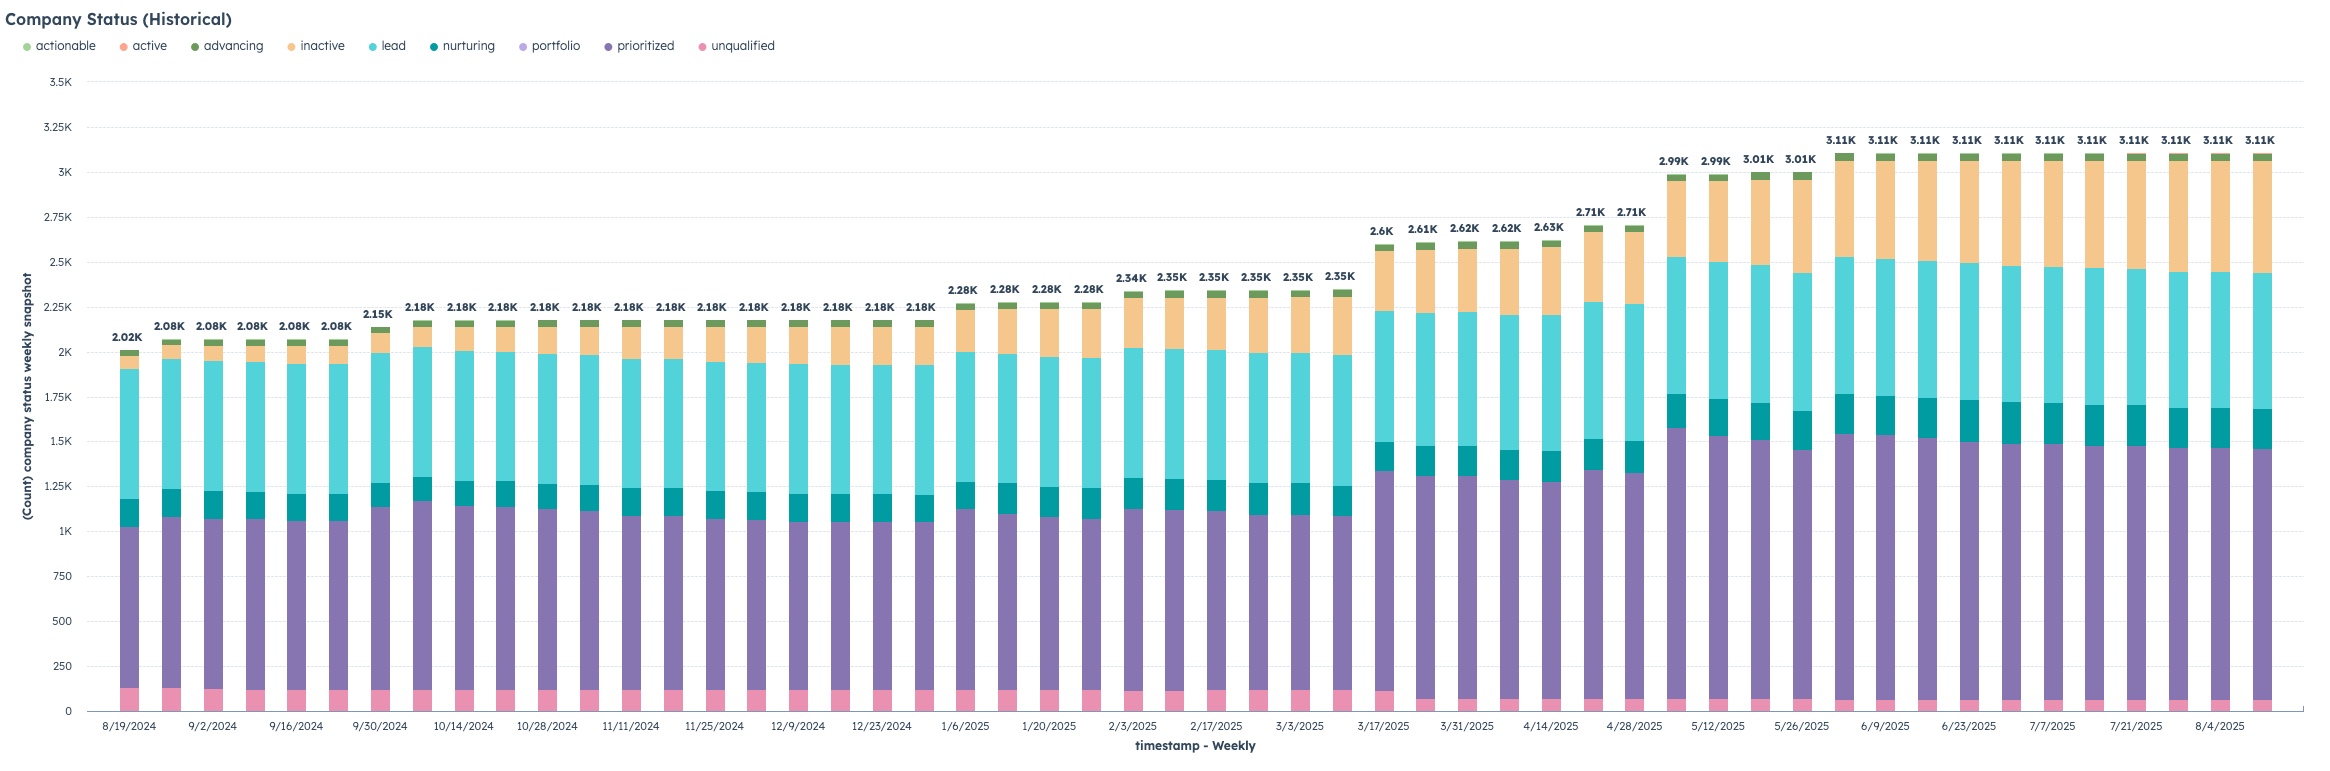
We had a client come to us recently who needed to be able to generate a report with weekly point-in-time snapshots of data of the “status” field on the company object, and wanted to be able to do it directly in Hubspot without any third party tools. The report needed to show the total number of companies that have a value, and what that value is, as of every Sunday night at midnight.
Hubspot can easily report on the up-to-date count of this field. Hubspot could easily be setup to do something like date-stamp when there was a change to this. And while the data about what historical values for the properties were (because the 100 most recent property changes and the dates of them are stored in the property history) there isn’t a way to bring this data up in a report; just in a hand audit of the field.
There are about 65k companies that currently have a value for this status. So something straight forward like creating a “status snapshot” custom object was out— They would rapidly exceed the volume of data that custom objects can store (52 weeks a year at 65k records per week = 3.3M per year), and plus— Its just not what custom objects really are for.
The solution
Enter the Custom Event. This often-ignored Hubspot object gets used sometimes for things like tracking app sign-ups, or 3rd-party interactions, most Hubspot users don’t regularly use it. What does it have going for it? A plenty-high 30 million record limit per month and batch updating of 500 completions per event. The tricky thing is that the way to record a custom event is either by API or by property change, but not both for the same event.

So— our solution was to create an api-based custom event for tracking a weekly status snapshot for each company. Using an API based one (as opposed to a property-change based one) allowed us to update it in bulk with historical data.
Note that for what I’ve got outlined below, you will need operations hub professional for the weekly recurring scheduling, and for the custom-custom code in workflow piece.
The process is simple— Create a custom event with just a date and status (if you’re snapshotting other data points, simply add in those fields), and have a workflow scheduled to run weekly. This company-based workflow simply fires for each company, and uses custom code to make an API call through a private-app it creates a custom event with the status of the company at the time the workflow runs.
Then, to bring historical data up to date, you can download the historical values for the field and create a CSV file with all of the historical snapshots, and run a python script to create custom events for each one of the historical values you want to import.
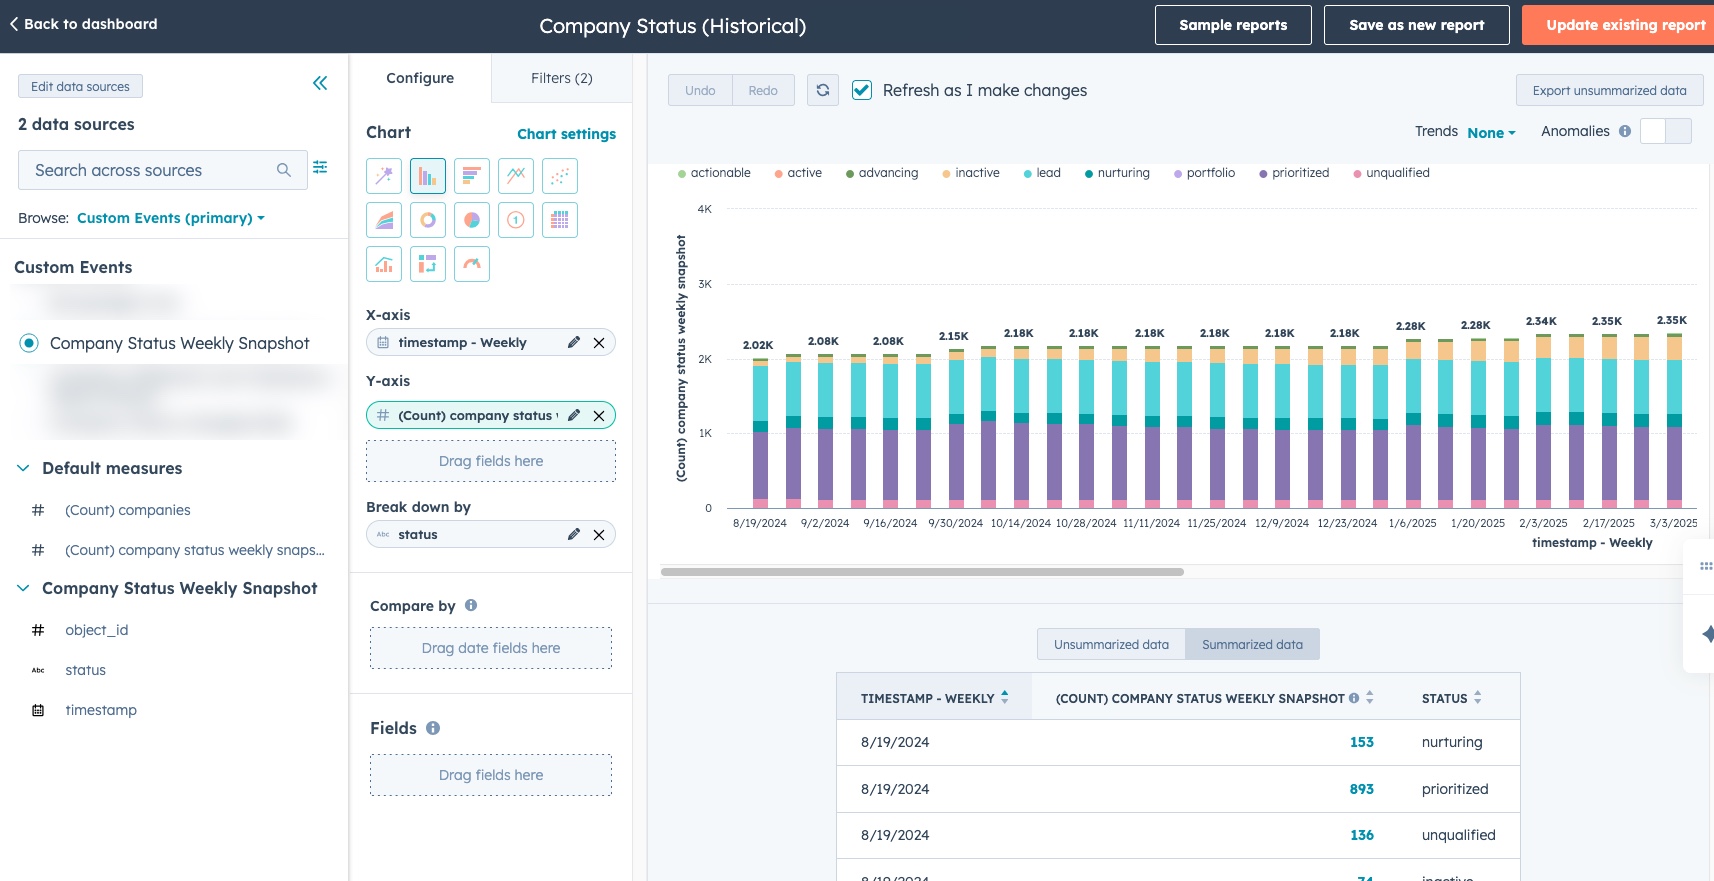
Once you’ve done the above— you can then create custom reports with the primary dimension being the “custom event” object you’ve created and the secondary being the company (or contact or whatever other object you’ve built this on), showing the weekly values for the status (or other data point you’re snapshotting).
Steal this work
Want to recreate this for your team? The following steps are what you’ll need. Expect probably 2-6 hours of work for the following + script running potentially overnight (depending on the volume of the historical data you are importing) for the catch-up. If you are just doing this for “now and moving forward” and don’t need historical data— The process is much simpler (about 30-90 minutes) and you can skip straight to step 3 below.
Ingredients:
- Super admin access to Hubspot to be able to create private events & download field history
- Operations Hub Pro or above
- Tool for running local python script (free; ChatGPT can give you instructions how to set this up on your computer if you don’t already have it— Its not as scary as it seems)
- Microsoft Excel
1 – Download field history
Whatever property on whatever object you’re going to snapshot, you will need the complete field history for. In Hubspot settings, go to the field settings for the object you will be snapshotting. Locate the property(s) that you want to snapshot, and export the data.

2 – Generate the CSV that contains all the historical snapshot data
Based on the time period you want to track, you will need to create a file that has columns with the date/time of the historical snapshots you want, and has rows of each instance of the object, with cell values being the actual value for that object at that time.
The Hubspot file export obviously doesn’t contain the data this way— Rows are object instances, but columns are alternating values and datetime of the value change.
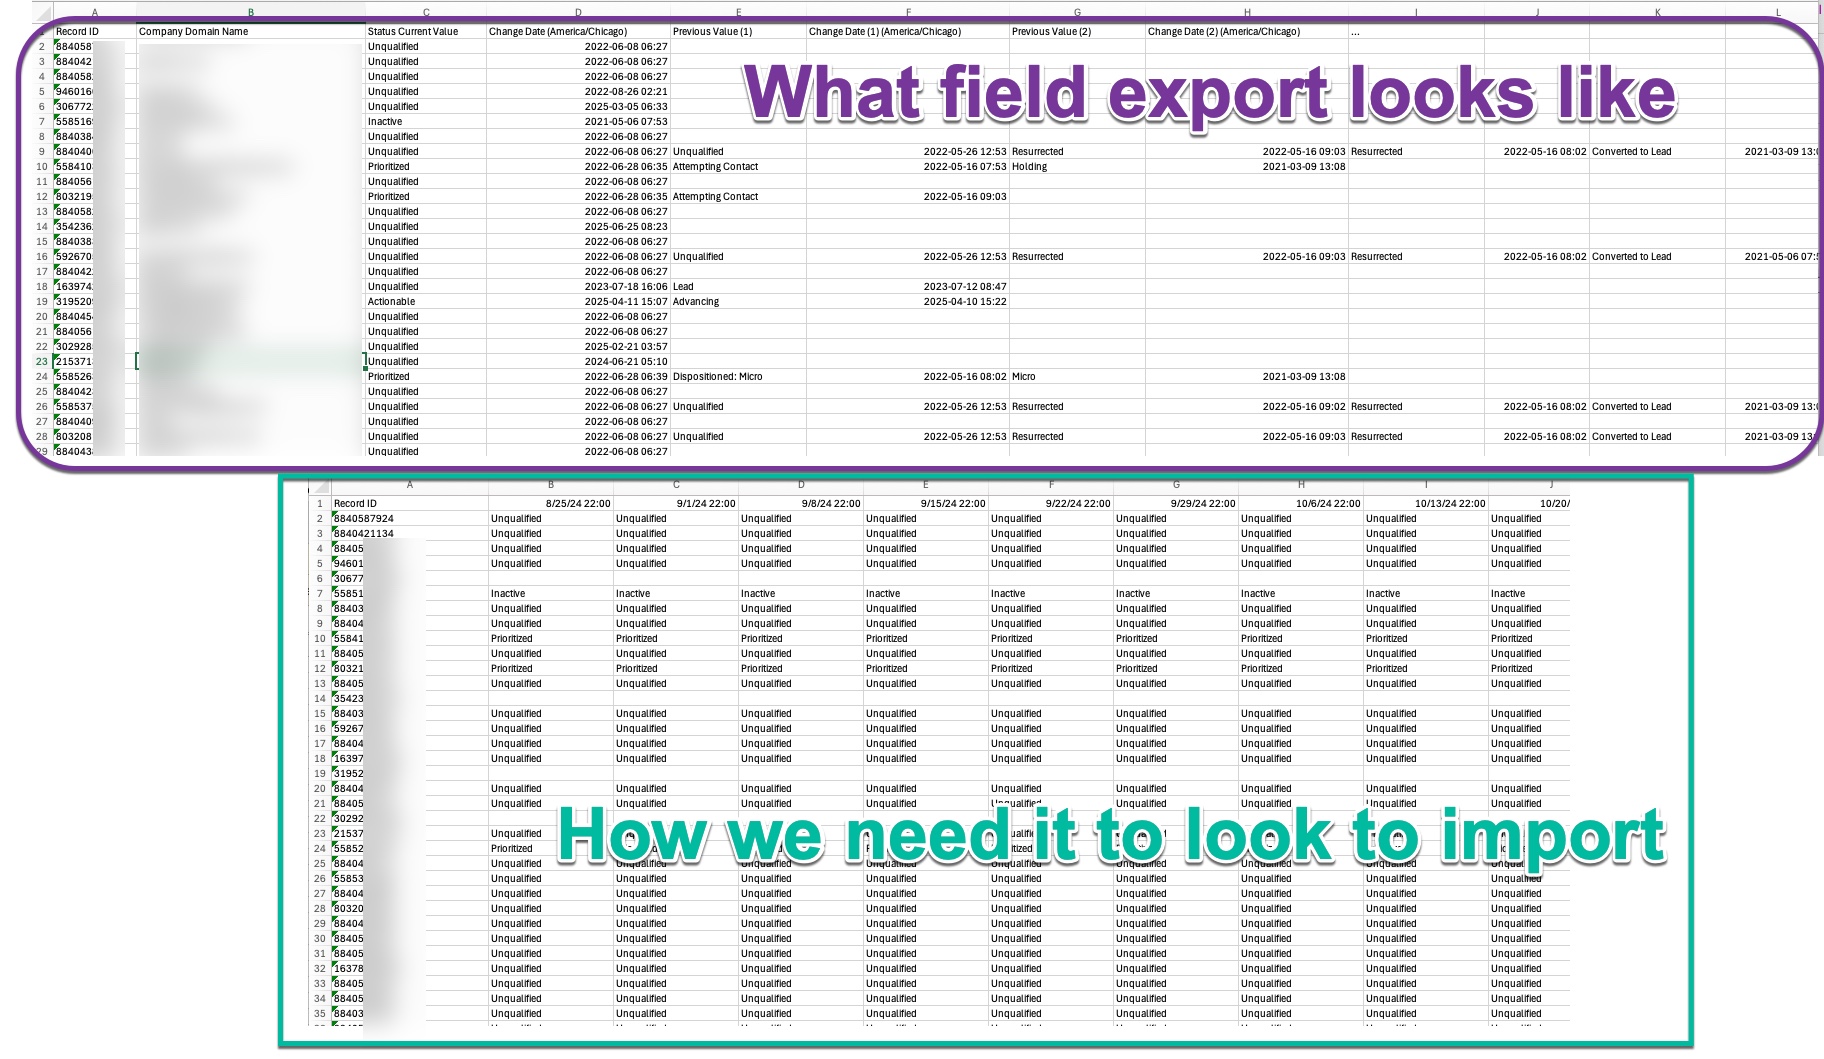
Open the export in Excel, and create a second sheet. Copy/paste your record ID column to the fresh sheet. Then in the top row, fill all the dates from present day to as far back as you need to snapshot, one datetime stamp per column. These could be monthly, weekly, or daily depending on what the stamping period you need. For our client, we needed 1 year of data snapshotted weekly, so a total of 52 columns were added.
Then in all the cells, you will need to put this excel formula. Put it in the top/left cell (B2) and then fill right and fill down so that the entire sheet gets filled. Adjust the sheetname (in my example below “Status” and the column where the actual status value is first found (in my example column C).
=IFERROR(
        INDEX(Status!$C2:$ZY2,
              MATCH(1,
                    (Status!$D2:$ZZ2<=B$1)*(Status!$D2:$ZZ2<>""),
                    0)
        ),
"")
If done correctly, filling this formula should result in each cell looking up the value for the status (or whatever other property you are snapshotting) at the datetime as specified in the column header based on the value in the first sheet. It should look something like the “How we need it to look to import” in the screenshot above.
Then create a new file, copy this data from this sheet into the new file, with a paste special > Values and Number Formats. Save this new file as a csv.
3 – Create Private App + Custom Event
Create a private app with the analytics.behavioral_events.send scope, instructions from Hubspot KB (if you haven’t done it before) can be found here: https://developers.hubspot.com/docs/guides/apps/private-apps/overview. Copy the access token and client secret, you will need these later.

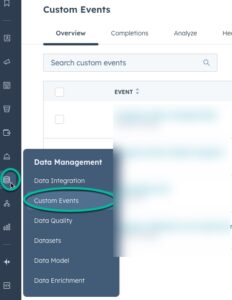
Then you’ll want to create your custom event. Navigate to Data Management > Custom Events and click “Create an Event”
Select “Send via API” as the event type

Set the name of the event (this will be how you locate it for reporting) and specify the property(s) you will be snapshotting. In our example it was just a “status” field, so I called it “status”. Recommend to use the same name as the property to keep it simple, but its not required.
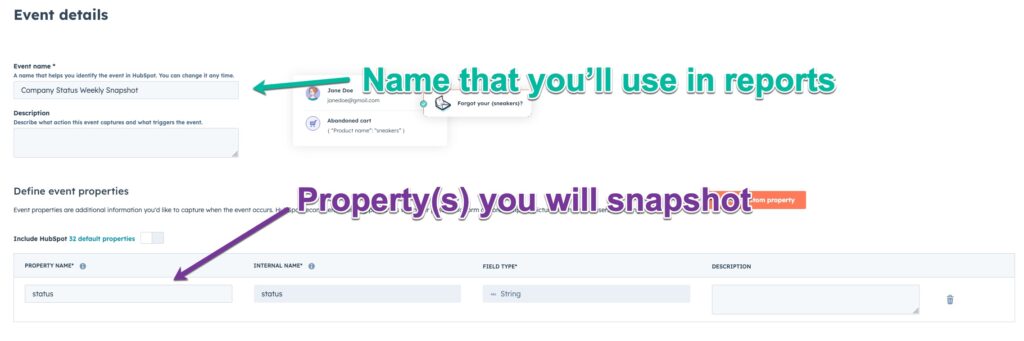
On the next screen, specify the object that you will be snapshotting (contact, company, or deal [or technically any other object as well])

Once created, you will notice that the event has an “internal name”— Note this as you will need it for in the steps below.

At this point— skip to step 5 if you do not need to upload any historical data, but if you are importing historical data complete step 4 below.
4 – Upload of historical data via API/Python
At this point, we’re going to input the data via API for historical values. Essentially creating a custom event instance for every cell of the CSV we generated in step 2 that has the value in the cell of the data point, with the timestamp from the column header, and associated with the record based on the row header value (record ID). You may have other tools that can do something like this, instructions below on how to do this via Python script. If you’ve never used Python before, ChatGPT is pretty good at walking you through installing it on your computer.
The following code will work to upload values via python, assuming you have created the CSV file with values as stated above in step 2:
import csv
import json
import time
import requests
from datetime import datetime
from dateutil import parser as dtparser
from zoneinfo import ZoneInfo
from tqdm import tqdm

# ---------- CONFIGURATION ----------
PRIVATE_APP_TOKEN = "PRIVATE-APP-TOKEN-HERE" # don't be bad like me and hard-code in private app tokens
CSV_FILE = "HISTORICAL-FILE-NAME-HERE.csv" # file name for CSV file
EVENT_NAME = "INTERNAL-EVENT-HERE"  # replace with event internal name
ACCOUNT_TZ = ZoneInfo("America/Chicago")

START_AT_EVENT = 1      # Number of non-blank cells to skip before starting
LIMIT_EVENTS = -1       # Set to -1 to run all remaining; or set to N for testing
BATCH_SIZE = 10         # HubSpot batch API limit
THROTTLE_DELAY = 0.05   # 83 batches per 10 seconds
API_URL = "https://api.hubapi.com/events/v3/send/batch"

# Generate Header
HEADERS = {
    "Authorization": f"Bearer {PRIVATE_APP_TOKEN}",
    "Content-Type": "application/json"
}

# Logging
failure_file = f"batch_failures_{datetime.now().strftime('%Y%m%d_%H%M%S')}.csv"
failure_fh = open(failure_file, "w", newline="", encoding="utf-8")
failure_writer = csv.writer(failure_fh)
failure_writer.writerow(["companyId", "occurredAt", "status", "error"])


def to_iso_utc(ts_str: str) -> str:
    dt_local = dtparser.parse(ts_str).replace(tzinfo=ACCOUNT_TZ)
    return dt_local.astimezone(ZoneInfo("UTC")).strftime('%Y-%m-%dT%H:%M:%SZ')


def send_batch(session, batch):
    time.sleep(THROTTLE_DELAY)
    payload = {"inputs": batch}

    try:
        resp = session.post(API_URL, json=payload, headers=HEADERS, timeout=15)
        if resp.status_code < 300:
            return True, None
        else:
            return False, f"{resp.status_code} {resp.text[:300]}"
    except Exception as e:
        return False, str(e)


def main():
    cell_counter = 0
    event_counter = 0
    batch = []
    start_time = time.time()

    with open(CSV_FILE, newline="", encoding="utf-8") as f:
        reader = csv.reader(f)
        headers = next(reader)
        iso_headers = [None] + [to_iso_utc(h) for h in headers[1:]]

        pbar = tqdm(desc="Events sent", unit="event")

        with requests.Session() as session:
            for row in reader:
                record_id = row[0].strip() # Switch object type to here

                for col_idx, cell in enumerate(row[1:], start=1):
                    if not cell.strip():
                        continue

                    cell_counter += 1
                    if cell_counter <= START_AT_EVENT:
                        continue

                    event = {
                        "eventName": EVENT_NAME,
                        "objectType": "COMPANY", # Switch object type to here
                        "objectId": int(record_id),
                        "occurredAt": iso_headers[col_idx],
                        "properties": {
                            "status": cell.strip()
                        }
                    }

                    batch.append(event)
                    event_counter += 1

                    if len(batch) == BATCH_SIZE:
                        ok, err = send_batch(session, batch)
                        if ok:
                            pbar.update(len(batch))
                        else:
                            for e in batch:
                                failure_writer.writerow([e["objectId"], e["occurredAt"], e["properties"]["status"], err])
                        batch.clear()

                        if LIMIT_EVENTS > 0 and event_counter >= LIMIT_EVENTS:
                            pbar.close()
                            failure_fh.close()
                            print(f"\nDone (LIMIT_EVENTS = {LIMIT_EVENTS}). Sent: {event_counter}")
                            return

                        if event_counter % 500 == 0:
                            elapsed = time.time() - start_time
                            rate = event_counter / elapsed
                            print(f"[INFO] Sent {event_counter} events in {elapsed:.1f}s ({rate:.2f} events/sec)")

            # Final batch flush
            if batch and (LIMIT_EVENTS < 0 or event_counter < LIMIT_EVENTS):
                ok, err = send_batch(session, batch)
                if ok:
                    pbar.update(len(batch))
                else:
                    for e in batch:
                        failure_writer.writerow([e["objectId"], e["occurredAt"], e["properties"]["status"], err])

        pbar.close()
        failure_fh.close()

    print(f"\nDone. Sent: {event_counter} events.")
    print(f"Failures logged to: {failure_file}")


if __name__ == "__main__":
    main()
To modify this for your specific needs, there are a handful of variables to set in the intro of the script, and then there is one place in the middle of the script that determines the object type that the events will be associated with. If you modify both of those, you should be good to go! You’ll need the private app access token you created in step 3 along with the internal name from the custom event created.

If you run into errors running this script, note that it does generate a log file for figuring out what went wrong. There is also a “start at event” and a “limit event” variable that you can set to stop/start the script in different points so that you can restart if you partially finish the imports. I would recommend probably testing with the fist 100 to 1,000 events or so to make sure its working, then use the “start at” function the next time through to finish it.
You can also adjust the pacing of the events. I found a 10 per batch size and a throttling delay of 0.05 seconds seemed to keep it within the limits that avoided any 429 but still got it done quickly, but mileage may vary.
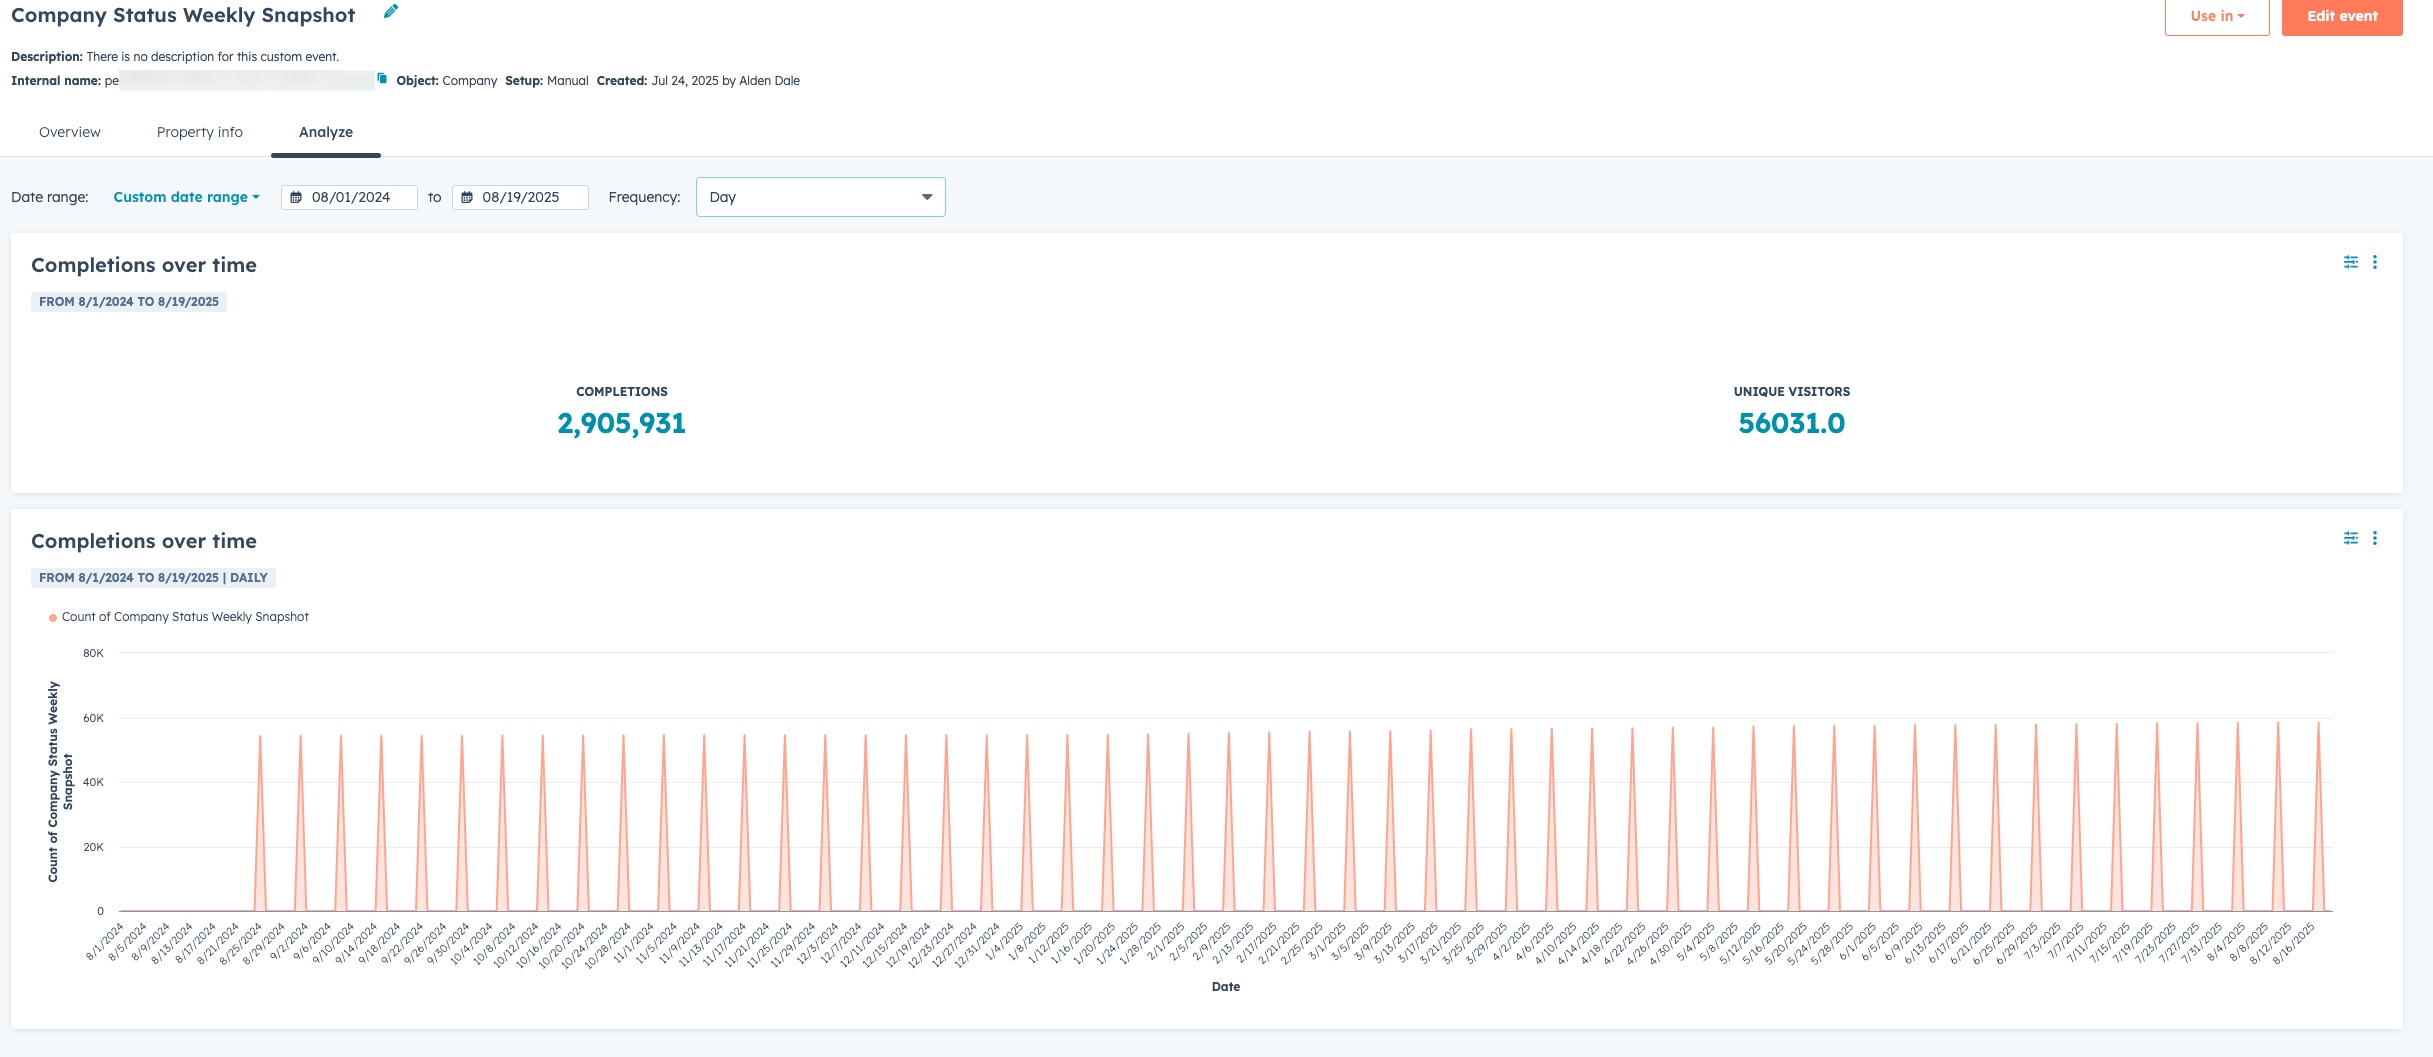
Run this script and you should then be able to see the events in there. If you look at the “analyze” tab of the custom event you should see something like the below.
5 – Create ongoing workflow that records future snapshots
The last piece of this is to build out a workflow that snapshots data in the future. Operations Hub Pro or Enterprise is required for this as you need both the custom code in workflow action as well as the ability to schedule recurring workflows.
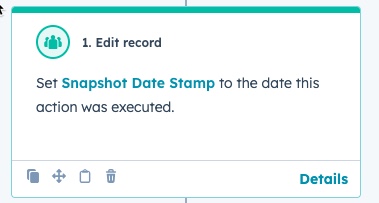
On whatever object you’re doing the snapshot report, you’ll want to create a “Snapshot Date Stamp” property. Reason being is that we want to stamp the event with the datetime the workflow kicks off, even if there is a slight delay in processing based on the volume.
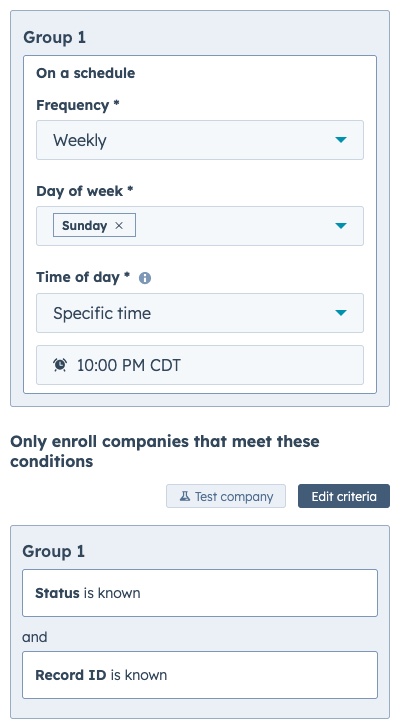
So— Create the workflow. We’ll want a scheduled workflow that runs at whatever time we want to do the snapshot, and the filter criteria (I would suppose) is “PROPERTY is known“ (whatever property you are snapshotting).
The first workflow action will just be to stamp the newly created property with the datetime the step executes.
Then, create a custom-code workflow action. You’ll want enable rate-limit throttling on the execution on this to ~14 per second to not get 429 errors (using what, at the time of writing is a beta feature)

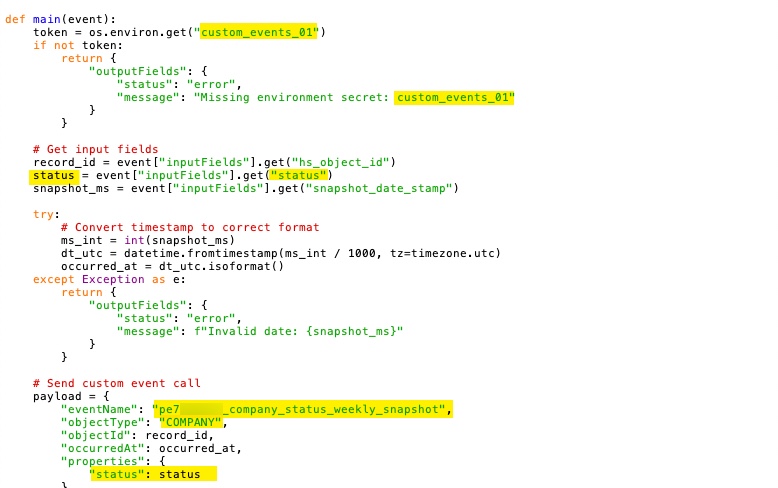
For the custom coded action, I used a python script. Make sure to add in your private app key and provide the three input fields as below.

The, place the following code as the code:
import os
import requests
from datetime import datetime, timezone

def main(event):
    token = os.environ.get("custom_events_01")
    if not token:
        return {
            "outputFields": {
                "status": "error",
                "message": "Missing environment secret: custom_events_01"
            }
        }

    # Get input fields
    record_id = event["inputFields"].get("hs_object_id")
    status = event["inputFields"].get("status")
    snapshot_ms = event["inputFields"].get("snapshot_date_stamp")

    try:
        # Convert timestamp to correct format
        ms_int = int(snapshot_ms)
        dt_utc = datetime.fromtimestamp(ms_int / 1000, tz=timezone.utc)
        occurred_at = dt_utc.isoformat()
    except Exception as e:
        return {
            "outputFields": {
                "status": "error",
                "message": f"Invalid date: {snapshot_ms}"
            }
        }

    # Send custom event call
    payload = {
        "eventName": "pe7125239_company_status_weekly_snapshot",
        "objectType": "COMPANY",
        "objectId": record_id,
        "occurredAt": occurred_at,
        "properties": {
            "status": status
        }
    }

    headers = {
        "Authorization": f"Bearer {token}",
        "Content-Type": "application/json"
    }

    url = "https://api.hubapi.com/events/v3/send"

    try:
        resp = requests.post(url, json=payload, headers=headers, timeout=10)
        if resp.status_code < 300:
            return {
                "outputFields": {
                    "status": "success",
                    "message": "Custom event logged"
                }
            }
        else:
            return {
                "outputFields": {
                    "status": "error",
                    "message": f"API error {resp.status_code}: {resp.text[:200]}"
                }
            }
    except Exception as e:
        return {
            "outputFields": {
                "status": "error",
                "message": str(e)
            }
        }
You will want to make a few adjustment to this script, notable the access token name, the field that is being snapshotted, the internal name of the custom event created above, and the object type that this event is related to. See the screen shot below for the areas that will need adjusting.
You may notice that the throttling on this may take a significant amount of time to complete the snapshot process if the records you will be snapshotting have any kind of significant volume. With enrollment based workflows, there is no way to leverage batch creations— Each call will just create one event. So if you’ve got say 50k records you’re snapshotting, with a max of 190 calls per 10 seconds (which I lower down to about 14 calls per seconds to avoid any 429 issues) this process would end up taking over an hour. If your volume is higher, it may be more. If you need this to run more quickly, you can look at this post I wrote about leveraging multiple private apps and random-sampling the workflow. This can allow you to get these done up to 5-10x faster pretty easily.
6 – Create reports with new events
The above instructions cover loading historical values and setting up the workflow that will do the regular snapshotting, whether its daily, weekly, or monthly.
Once the data is in there— Custom Reports can be used to report on the data. Simply have the Custom Event be the primary dimension in the report, and the object they are associated to as the secondary object. You can then filter by the values on the field you are snapshotting, the datetime of the snapshot, or any values on the associated object as well.
Any other questions? Feel free to reach out!